How to Brew Japanese-Style Iced Coffee at Home
How to Brew Japanese-Style Iced Coffee at Home guides you to make a bright, clean iced cup using flash brew (pour-over on ice). Learn the gear you need — dripper, kettle, scale, filters and an ice-safe carafe — plus the best beans and roast to keep flavors lively. Simple, practical steps cover grind, ratio, water temperature, timing and quick tricks to avoid dilution. Perfect for fast, fresh iced coffee you can make at home.
Key Takeaway
- Brew hot and pour it straight over ice to lock in flavor.
- Use a medium-fine grind for a bright, clean cup.
- Make the brew stronger so the ice won’t water it down.
- Pour slowly and stir gently to cool fast and keep aroma.
- Use fresh beans and grind just before you brew.
Flash Brew Basics: How to Brew Japanese-Style Iced Coffee at Home
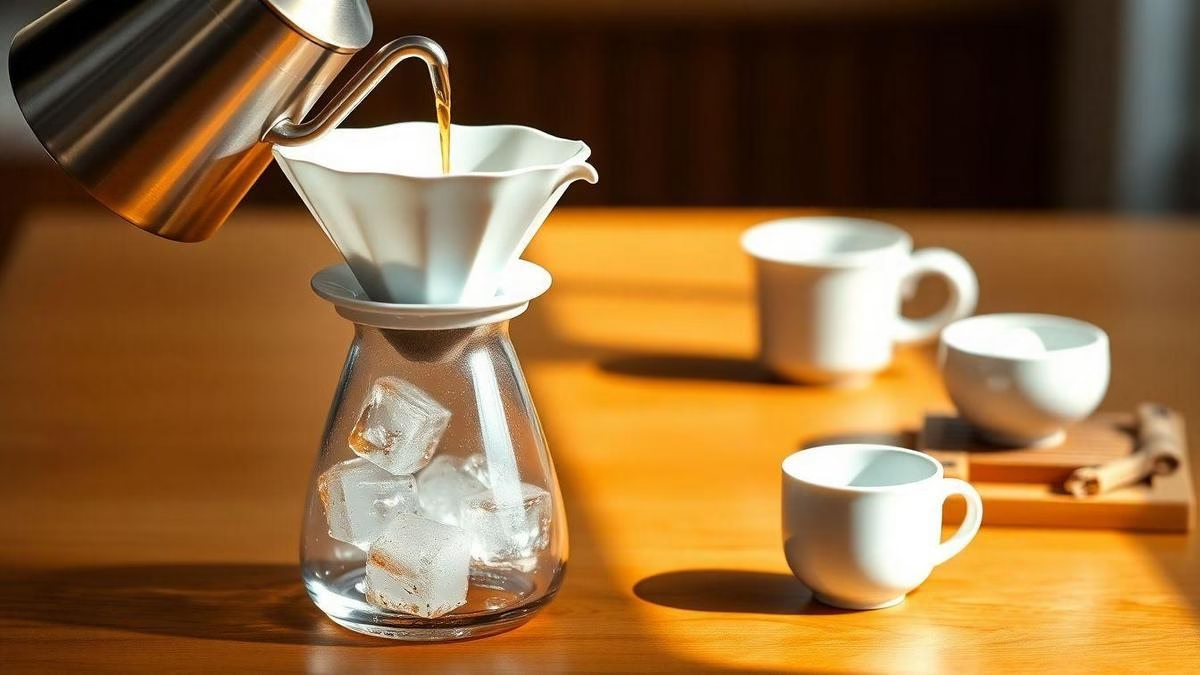
Japanese-style iced coffee (flash brew) is brewing hot coffee directly onto ice so the cup cools instantly. That traps aromatic oils and bright acids, giving a clear, lively cup instead of a flat, watery one. Flash brew preserves fruit notes and clean acidity that often disappear when coffee is brewed hot and then cooled. Flash-brew pour-over on ice method
You don’t need fancy gear — a pour-over dripper, gooseneck kettle, fresh beans, and ice are enough. The speed of brewing and cooling is what keeps flavors bright.
Tip: Brew hot, cool fast. That speed is what keeps the flavors bright and crisp.
What flash brewing is and how to use it
Flash brewing extracts flavors quickly with hot water, then immediately chills the liquid with ice, preventing stale or over-extracted notes. Weigh coffee and ice, set your grind, and pour like a normal pour-over but a bit faster. Watch the color change as it cools — that’s the good part.
Why pour-over over ice makes a bright cup
Instant cooling keeps acidity and aroma lively, delivering clarity and a cleaner finish than slow-chilled or hot-then-cooled coffee. Tweak grind, water temp, or ice amount to change balance — medium-fine grind works for most beans.
Quick recipe (flash brew)
- 20 g coffee, medium-fine grind
- 180–220 g ice in serving cup
- 300 g hot water at ~94°C (200°F)
- Brew time: 2:30–3:00 minutes
Stir gently, taste, and adjust next time.
| Item | Amount | Notes |
|---|---|---|
| Coffee | 20 g | Medium-fine grind |
| Hot water | 300 g | ~94°C (200°F) |
| Ice in cup | 180–220 g | Chill and reach desired strength |
| Brew time | 2:30–3:00 | Pour steady, finish over ice |
Quick tip: If your brew tastes diluted, use slightly less ice or more coffee next time. Small tweaks make big differences.
Equipment and Filters You Need
A V60 or Kalita Wave dripper gives control over flow and extraction. Ceramic or glass drippers hold heat better at home; plastic is fine for travel. A gooseneck kettle lets you pour precisely; a scale keeps your math honest. A burr grinder ensures consistent grind size; avoid blade grinders for clean results. Brewing fundamentals and standards guide
Use quality paper filters matched to your dripper, and rinse them to remove paper taste and preheat the dripper. For the carafe, pick borosilicate glass or stainless steel that handles thermal shock when hot coffee hits ice.
How to set up before brewing
- Place carafe on scale and add ice.
- Put dripper with rinsed filter on top and tare scale.
- Grind coffee fresh into the filter, set kettle to temp, have a timer ready.
- Lay out towel, cup, and spoon so nothing slows you down.
| Item | Why it matters | Good picks |
|---|---|---|
| Dripper | Controls flow and extraction | Hario V60, Kalita Wave |
| Filters | Shape/thickness change clarity | V60 papers, Kalita flat-bottom |
| Kettle | Pour control and temperature | Gooseneck kettles (1L) |
| Scale | Accurate dosing and timing | Any grams scale with tare |
| Carafe | Handles ice and hot coffee | Borosilicate glass, stainless steel |
Tip: Measure by weight — ice mass brew water roughly equals final beverage weight.
Best Coffee Beans and Roast Tips
For flash brew, choose beans with clear, bright flavors — citrus, stone fruit, or floral notes. Light to light-medium roasts preserve brightness; dark roasts mute acids and deliver heavier, chocolatey notes. Roast date matters: buy beans roasted within the last 2–4 weeks and grind just before brewing. Information on coffee varieties and flavors
| Origin / Type | Typical Roast | Flavor notes | Best use in flash brew |
|---|---|---|---|
| Ethiopia (Yirgacheffe) | Light | Floral, berry, tea-like | Maximum brightness |
| Kenya | Light–Medium | Citrus, bright acidity | Sparkling, juicy cups |
| Colombia | Medium | Caramel, balanced | Sweet clarity with body |
| Guatemala | Medium | Cocoa, nutty, fruity | Balanced, slightly richer |
| Brazil | Medium–Dark | Nutty, chocolate | For smoother profile (sparingly) |
Choosing beans for bright flavor
Look for origin notes saying citrus, floral, or stone fruit. Washed beans give cleaner, tea-like clarity; natural-process beans are fruitier. Aim for beans roasted 7–21 days before purchase and use them over the next 2–4 weeks.
Flash brew highlights the bright parts of a bean like a camera flash — it freezes the sparkle.
Storing beans
Keep beans in an airtight, opaque container in a cool, dark spot. Buy small bags and finish them in 2–4 weeks. If freezing, portion and thaw once.
Brewing Ratio and Grind Size for Iced Pour-Over
Plan for dilution. Brew a concentrate that will be diluted as ice melts. Aim for a grind just a touch finer than your usual pour-over (table salt to fine sand). Avoid too fine, which over-extracts. Brewing ratios, methods and tips
Pick a final coffee:water ratio (common targets: 1:13 strong, 1:15 balanced, 1:17 light). If brewing onto ice with equal mass of hot water and ice, use this formula: hot water (g) = (final ratio ÷ 2) × coffee (g).
| Strength | Coffee (g) | Hot water (g) | Ice (g) | Final ratio | Suggested grind |
|---|---|---|---|---|---|
| Strong | 20 | 130 | 130 | 1:13 | Medium-fine (fine sand) |
| Balanced | 20 | 150 | 150 | 1:15 | Medium-fine (table salt) |
| Light | 20 | 170 | 170 | 1:17 | Medium (table salt to sand) |
Adjust grind one step coarser if too bitter, one step finer if too weak.
How to adjust grams of coffee and ice
Decide final ratio (e.g., 1:15). Choose coffee dose. Calculate hot water = (final ratio ÷ 2) × coffee grams and match with same grams of ice. Example: 18 g coffee at 1:15 → hot water = (15 ÷ 2) × 18 = 135 g hot water 135 g ice.
Small tweaks: increase coffee grams for strength, reduce ice mass for less dilution, or change final ratio (1:13 punchier, 1:17 mellow). After changing grams, tweak grind slightly.
Water Temperature and Timing
Temperature and timing control extraction. For flash brew, use water at 92–96°C (197–205°F). Because the brew hits ice, you can lean a bit hotter than for hot pour-over to pull acids and sugars quickly without too much bitterness.
Typical timing:
- Bloom: 30–45 seconds with ~2× coffee weight in water.
- Main pours: short pulses until total brew time ~2:30–3:30 minutes.
Use steady concentric pours rather than bursts.
| Step | Water Temp | Timing | Notes |
|---|---|---|---|
| Bloom | 92–96°C | 30–45 sec | Wet grounds, release CO2 |
| Main pours | 92–96°C | 2–3 min (pulses) | Short pours and pauses |
| Total brew | N/A | 2:30–3:30 | End with coffee brewed onto ice |
Tip: Use a thermometer and timer. Mark one go-to recipe on a sticky note — coffee grams, ice grams, bloom time, total time — then tweak by a degree or a few seconds.
Tips to Prevent Dilution & Choosing Between Methods
Brew stronger than usual (1:9–1:10 when pouring over ice) to allow room for melting. Chill tools and server to reduce heat loss. Make coffee over a bed of ice in the server rather than adding ice to a hot cup. Use coffee ice cubes (freeze brewed coffee) to avoid watering down the drink.
Tip: Freeze brewed coffee into ice cubes and use a stronger brew ratio (1:9–1:10) when pouring over ice.
Seven practical tips to prevent dilution
- Brew extra strong (higher coffee-to-water).
- Cool quickly: chilled equipment or ice bath.
- Pour over ice, not into a hot cup.
- Use coffee ice cubes.
- Pre-chill cup/server.
- Shorten contact time for delicate methods.
- Adjust grind: finer for flash, coarser for long cold extraction.
Flash brew vs Cold brew
- Flash Brew: Minutes, bright and clean, lighter body — ideal for immediate, aromatic iced coffee.
- Cold Brew: 12–24 hours, smooth and mellow, fuller body — ideal for low-acidity, concentrated base.
Conclusion
You’ve got the recipe to make a bright, clean iced cup at home. Use the flash brew / pour-over on ice method: short, hot brew poured over ice to trap fleeting aromatics. Get your tools — dripper, gooseneck kettle, scale, burr grinder, ice-safe carafe — and dial in grind, ratio, water temperature, and timing.
Watch dilution: brew stronger, weigh ice, try coffee ice cubes, and tweak grind in small steps. Fresh beans, roasted recently, reward you with clarity and sweetness.
Experiment one variable at a time: taste, tweak, repeat. You’ll soon master how to brew Japanese-style iced coffee at home that’s crisp, lively, and exactly how you like it.
Want more recipes and tips? Read more at https://guiabebefeliz.com.
FAQ — How to Brew Japanese-Style Iced Coffee at Home
Q: Can I use dark roast for flash brew?
A: Yes, but expect less brightness and more chocolate/nutty notes. Light to medium roasts showcase floral and citrus clarity best.
Q: What if my iced coffee tastes weak?
A: Use less ice or more coffee, or lower the final ratio (e.g., 1:13). Also try a slightly finer grind.
Q: How long should I wait after roasting beans?
A: Aim for beans roasted 7–21 days before purchase and use within 2–4 weeks for best balance of aroma and stability.
Q: Is flash brew the same as pour-over on ice?
A: Yes — flash brew is simply pouring hot pour-over directly onto ice to chill instantly.

Rafael Souza is a digital marketing specialist and passionate coffee enthusiast. He founded Guiabebefeliz to share practical, easy-to-follow guides for making great coffee at home without needing professional barista skills. His mission is to help readers enjoy better coffee experiences, one cup at a time.


