Beginner’s Guide to Brewing Siphon Coffee at Home introduces you to siphon brewing with clear, friendly steps. You’ll see how the double‑chamber vacuum brew works and why immersion plus vacuum change the taste. Get simple safety tips, a list of must‑have gear, and a short step‑by‑step workflow you can follow. Learn the right grind, brew ratio, and temperature, fix common problems fast, and try easy recipes for great cups at home. This Beginner’s Guide to Brewing Siphon Coffee at Home is aimed at getting you brewing reliably while preserving the ritual and fun of the siphon.
Key Takeaway
- Grind your beans fresh to a medium‑fine size.
- Measure coffee and water for steady results (use grams).
- Heat until water rises, stir gently, then lower heat for a clean drawdown.
- Clean your siphon after each brew to keep flavor consistent.
How siphon coffee brewing works with a vacuum coffee maker
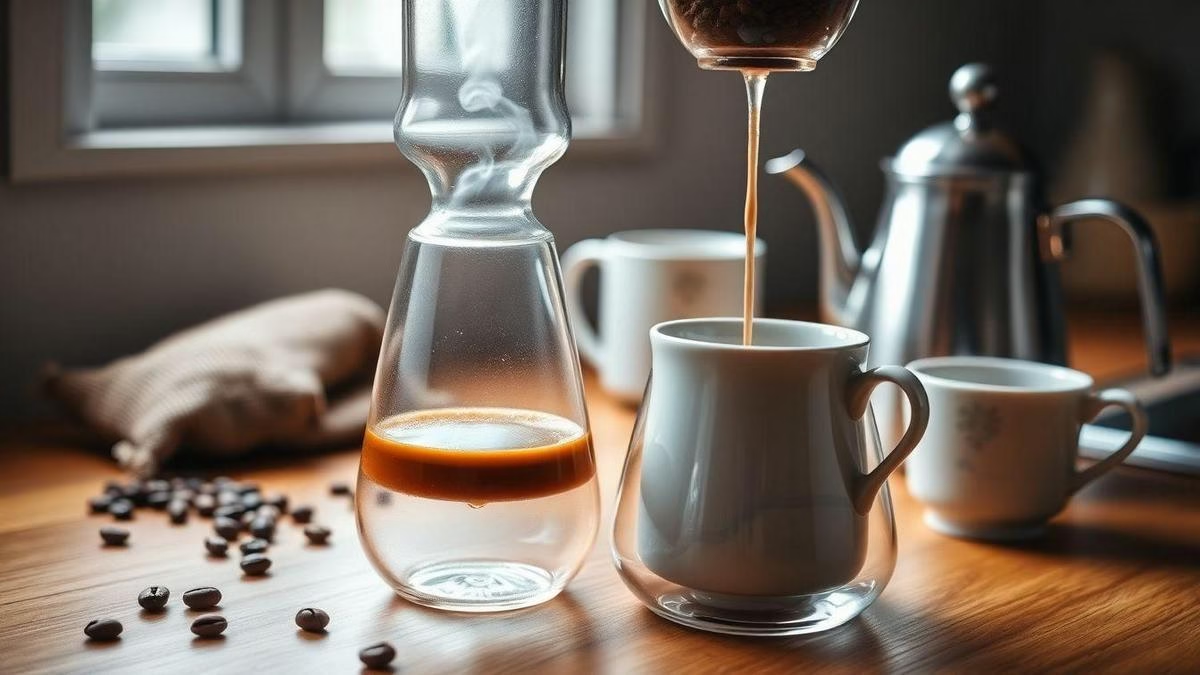
Siphon coffee is kitchen theater you can brew at home. In this Beginner’s Guide to Brewing Siphon Coffee at Home, you’ll watch water climb into a glass globe, meet the grounds, and then fall back through a filter. Heat the lower chamber; steam pressure pushes water up the stem into the upper globe where the grounds steep. For a concise overview of the mechanism and history, see How vacuum (siphon) coffee makers work.
You’ll learn to tune grind size, water dose, and timing to taste. A medium‑fine grind and a steady five to seven minutes of visible activity is a good starting point, but your palate is the final judge. Treat the siphon like a short performance: watch, taste, and tweak.
The two‑chamber vacuum process explained
The siphon has two main parts: the bottom bulb (water & collection) and the top globe (brewing). Heat the bottom and vapor forces water up the stem into the top. Once mixed with grounds you have immersion extraction; when the heat is reduced the vapor condenses, creating a partial vacuum that pulls the liquid back down through a filter.
Stage | What happens | Rough time | Quick tip
- –|—:|—:|—
Heat & Rise | Water moves up to the upper chamber | 1–3 min | Use gentle heat to avoid boiling over
Immersion & Stir | Grounds bloom and steep | 1–3 min | Stir once to wet grounds evenly
Cool & Drawdown | Vapor condenses, coffee pulled down | 1–2 min | Lower flame early for a clean drawdown
Why immersion and vacuum change flavor
Immersion provides even extraction (like a French press) while the siphon’s filter yields clarity. The vacuum step stops extraction quickly, trapping aromatics and delivering bright, clean notes. For a rounder cup, use a coarser grind or shorter steep; for brightness and clarity, use a finer grind and brisk drawdown.
Essential siphon coffee equipment you need
Siphon coffee looks dramatic, but the gear is straightforward. If you follow this Beginner’s Guide to Brewing Siphon Coffee at Home, start with a stable siphon set (upper and lower chambers), a stand, and a burner. Add a burr grinder, scale, and kettle to control factors that shape taste.
Material and fit matter: borosilicate glass resists thermal shock; check for spare cloth filters and rubber gaskets before you commit. For practical recommendations on equipment choices and filter types, consult Brewing equipment guidance for home baristas.
Choosing a vacuum coffee maker and burner
Pick a siphon size that matches how you drink coffee: 3‑cup for one or two people, 5–8 cup for groups. Burners: alcohol (simple, slower), butane (fast, fine control), electric/halogen (tidy, pricier). Match burner type to your space.
Filters, scales, and equipment list
Filters affect texture and clarity. Cloth softens and retains some oils; paper gives a bright, clean cup; metal/glass allow more body. Keep extras of cloth filters and gaskets.
Item | Purpose | Quick tip
- –|—|—
Siphon (glass set) | Main brewer | Choose borosilicate glass
Burner (alcohol/butane/electric) | Heat source | Butane = faster control; alcohol = simple & safe
Cloth/Paper filter | Clarifies & controls oils | Rinse paper; wash cloth filters after each use
Burr grinder | Consistent grind | Start medium‑fine; adjust 1–2 clicks
Digital scale | Accurate ratios | Use grams; aim for 1:15–1:16
Gooseneck kettle | Controlled pour | Slow, even pouring matters
Stirrer & timer | Agitation and timing | Gentle stir 10–15 sec; time the brew
Replacement gaskets & seals | Maintenance | Keep spares; dried gaskets leak
Quick equipment checklist before brewing
Check glass for chips, set the filter in the upper chamber, measure water and coffee, light the burner and test flame, confirm grinder is set to medium‑fine, have a stirrer and timer ready, and keep a towel nearby.
Do a dry run without coffee the first time to learn how parts fit and where steam appears.
Step‑by‑step guide for siphon coffee for beginners — how to brew siphon coffee
You’re holding a gadget that looks like science class. This Beginner’s Guide to Brewing Siphon Coffee at Home will walk you from setup to pour.
- Set up gear: lower & upper bulbs, filter, burner, stand.
- Measure coffee and water on a scale. Aim 1:15 as a start.
- Light burner and bring water to the upper chamber.
- Add freshly ground coffee (medium‑fine), stir once to wet grounds, start timer.
- Keep heat steady during immersion (90–120 sec typically).
- Cut heat, allow drawdown (aim 30–60 sec).
- Remove upper globe, decant, and serve.
Watch the glass; steady heat prevents boil‑overs and a clean drawdown gives clarity. Keep notes on grind and time so you can repeat a cup you like.
Preparing water, coffee, and filter
Use fresh, filtered water heated to 92–96°C (197–205°F). No thermometer? Bring to near boil and rest 30 seconds. Grind to medium‑fine—finer than drip, coarser than espresso—and weigh coffee (1:15–1:16). Rinse cloth/metal filter with hot water to remove residues and preheat the setup.
Timing the brew and drawdown technique
Start timing when water reaches the upper chamber and grounds are added. Stir gently and steep 90–120 seconds for most beans. Cut the heat to begin drawdown; aim for 30–60 seconds. Too fast = grind too coarse; too slow = too fine or clogged filter.
Step | Grind | Coffee:Water | Brew time | Drawdown
- –|—:|—:|—:|—:
Start | Medium‑fine | 1:15–1:16 | 90–120 sec | 30–60 sec
Short workflow: Preheat set, add coffee, bring water up, stir steep 90–120s, cut heat, wait for drawdown, decant.
Getting the right grind size, brew ratio, and water temperature
Grind, ratio, and temperature are the trio that control your results. Start with medium‑fine grind, 1:15 ratio, and 92–94°C water. Make small, single‑variable adjustments between brews and take notes. For additional industry‑backed tips on ratios and temperature, consult practical brewing ratios and temperature guidance.
Tip: For reliable starts, try 1:15, medium‑fine grind, 92–94°C water.
Recommended grind size and why it matters
Medium‑fine—coarser than espresso, finer than drip—gives surface area for quick extraction without clogging filters. Too fine = bitterness; too coarse = weak cup.
Best water temperature and common brew ratio
Aim 92–94°C (197–201°F). Dark roasts can be brewed a degree or two cooler; light roasts benefit from higher temps. Ratios: 1:14 (bolder) to 1:16 (cleaner). Use grams for consistency.
Element | Typical Recommendation | Quick Why
- –|—:|—
Grind size | Medium‑fine | Balances extraction & clarity
Water temp | 92–94°C | Extracts aromatics without harshness
Brew ratio | 1:14–1:16 | Controls body & perceived strength
Fast calibration tips
Run three experiments: vary ratio with constant grind/temp; then adjust grind around medium‑fine; finally tweak temperature ±2°C. One variable per run.
Common siphon coffee troubleshooting and fixes
Check three things first: water temp/level, filter fit, and grind. Clean glass and components regularly; old oils and warped filters alter flow and taste. For a general overview of typical vacuum/siphon issues and historic context see common siphon brewing problems and fixes.
Before you adjust grind or dose, verify the filter and seal. A misaligned filter is a silent thief of great siphon coffee.
Solving slow or no drawdown
Slow/no drawdown usually means blocked flow. Check and clean the filter and siphon tip. Ensure a steady, centered flame—weak heat won’t create the pressure difference. Press the top gently to test seals.
“If it sits there like a stuck faucet, check the simple stuff first — filter, flame, and seals.”
Fixing bitter or weak cups
Bitter = too fine, too hot, or too long a steep. Coarsen grind slightly and shorten steep by 15–30s; lower temp if necessary. Weak = too coarse, low dose, or underextracted. Finer grind or higher dose in small steps.
Quick diagnostics:
Symptom | Likely Cause | Quick Fix
- –|—|—
No drawdown | Clogged filter/tube | Clean filter/tube; check for fines
Slow drawdown | Weak heat or leak | Increase flame; check seals
Bitter taste | Too fine / too hot / long steep | Coarsen grind; reduce temp/time
Weak taste | Too coarse / low dose | Finer grind; raise dose slightly
Cloudy/oily cup | Old filter or dirty glass | Deep clean; replace cloth filter
Flavor tips, recipes, and serving ideas using siphon coffee technique
The siphon highlights delicate floral and fruity notes—use single‑origin or lighter roasts to showcase them. Treat early brews as experiments: change one variable at a time and take notes. Serve in pre‑warmed cups to preserve aroma and temperature; pair with light pastries or citrus desserts to complement the bright cup.
How siphon technique affects taste and extraction
Siphon is full‑immersion with a filtered finish: you get rounded mouthfeel plus clarity. Shorter immersion emphasizes brightness; longer adds sweetness and body. Adjust grind coarseness for clarity or extraction but avoid over‑fine grinds that clog filters.
Simple recipes, brew ratio tweaks, and milk pairings
Start with 1:15. Example recipes:
Style | Coffee (g) | Water (g) | Grind | Steep Time | Temp | Milk Pairing
- –|—:|—:|—|—:|—:|—
Classic | 16 | 240 | Medium‑fine | 60–90 s | 92–96°C | Light splash
Bright/Citrus | 14 | 238 | Medium | 45–60 s | 90–94°C | Minimal milk
Bold/Milk drinks | 18 | 234 | Medium‑fine | 75–90 s | 94–98°C | Latte / flat white
Tip: For milk drinks, brew slightly stronger (lower ratio) so coffee holds up to milk.
Serving temperature and storage notes
Serve around 60–65°C in the cup. Don’t store brewed siphon coffee long—aroma fades after 20–30 minutes. Store beans in a cool, dark place, grind just before brewing. If necessary, keep brewed coffee in an insulated carafe and drink within an hour.
Conclusion
You now have the basics to turn your counter into a little coffee lab. This Beginner’s Guide to Brewing Siphon Coffee at Home covered how the siphon works—heat lifts water, immersion extracts flavor, and vacuum drawdown gives clarity—and focused on the three essentials: grind, ratio, and temperature. Start simple: measure dose, set a steady flame, stir once, and watch the glass. Clean parts after each brew and keep notes. A few practice brews will teach you faster than guessing. The siphon is ritual and reward in one—enjoy the experiments and the cups that sing.

Rafael Souza is a digital marketing specialist and passionate coffee enthusiast. He founded Guiabebefeliz to share practical, easy-to-follow guides for making great coffee at home without needing professional barista skills. His mission is to help readers enjoy better coffee experiences, one cup at a time.


